This is the second part of a two part blog that provides details of how to configure access to various corporate resources.
In Part 1 we looked at configuring map templates, style files and coordinate reference systems. In Part 2 we will cover toolboxes and metadata style sheets and also briefly mention the Advanced Settings utility that is provided as part of the ArcGIS Desktop installation.
The following examples are based on an ArcGIS 10.x installation on a Windows 7 machine, and require changes to Windows Registry settings (this is discussed in more detail in Part 1). It is strongly recommended that you back up the registry before making any changes as an incorrect change to your computer’s registry could render your computer inoperable.
1. Toolboxes:
Custom toolboxes can be used to store common used tools, models and workflows with end users. These can be stored on individual user machines; however, there are many advantages of storing them in a network folder location such as having the ability to add or deprecate tools easily or modify existing tools.
1.1. The following registry setting controls the default Toolbox folder in ArcGIS:

1.2. To deploy corporate toolboxes from a folder or network location, navigate to the above registry folder.
1.3. Right-click the Settings folder and select New > String Value. Enter value name My Toolboxes Folder. Double-click the My Toolboxes Folder string value and change the value Data setting to the new location of the My Toolboxes Folder. Use UNC paths for network locations.
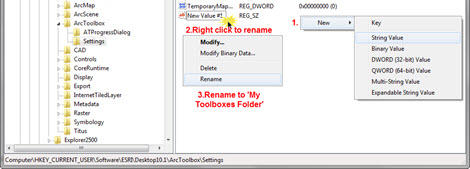
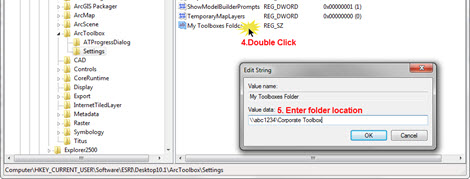
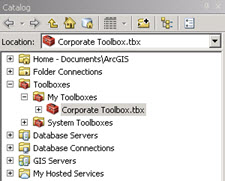
1.4. To verify the change, open ArcMap, open the Catalog pane and expand Toolboxes. The Corporate Toolbox added above will be visible under My Toolboxes. This change will also be visible in ArcCatalog. This registry change can now be deployed across the entire organisation.
2. Metadata:
When you need to create metadata for many ArcGIS items, it helps to streamline the task by ensuring that all users in your organisation are using the same metadata stylesheet. To set default style sheet for viewing or creating metadata across the ArcGIS suite in your organisation, follow these steps.
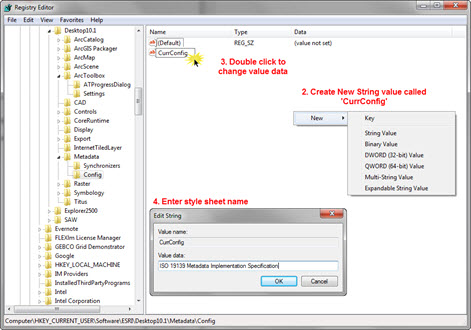
2.1. The following registry setting controls the default metadata configuration in ArcGIS:

2.2. To change the default metadata stylesheet, navigate to the above registry folder.
2.3. Create a new Key called Config.
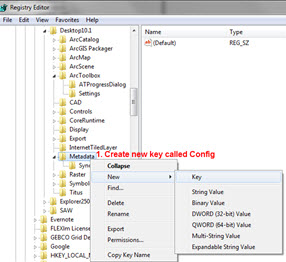
2.4. Next, create a new String Value called CurrConfig and change the value Data of CurrConfig to the desired metadata style sheet. For example, you could set it to: “ISO 19139 Metadata Implementation Specification” (without quotes). See here for a full list of style sheets available.
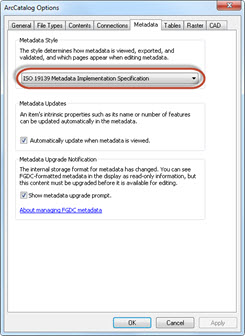
2.5. To verify the change, open ArcCatalog, navigate to ArcCatalog Options and click the Metadata tab .The default metadata style sheet added above will be visible as default. This change will also be visible in ArcMap. This registry change can now be deployed across the entire organisation.
But wait, there’s more!
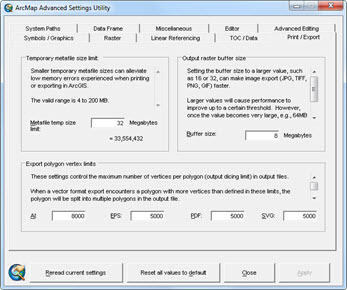
The above registry changes are ideal for use by IT Administrators to enforce corporate GIS standards to multiple users. More advanced users, wanting to customise their own environment, might like to take a look at the Advanced ArcMap Settings utility.
This tool and a PDF guide explaining it are located at Program FilesArcGISDesktop10.xUtilities. It allows additional customisations, such as changing where temporary files are stored, changing default print settings, etc. and allows you to personalise your ArcGIS experience.
Happy customising!
Posted by Dhowal Dalal, GIS Consultant, Exprodat.


