In GIS terminology a ‘mask’ is a spatial layer that one uses to limit the ‘view’ of a region. For example, if you were looking at the geology of the North Sea region, but only really interested in the marine environment you might employ a ‘land mask’. This would be a polygon that lies on top of your geology blocking the bits on land from view, so that only the marine geology was visible. GIS users have been using masks cartographically like this for as long as GIS has been around.
It’s all getting a bit more sophisticated these days, and there is now something in ArcGIS Desktop called a ‘geoprocessing mask’. A geoprocessing mask specifies a region that will be included in any geoprocessing functionality.
As an example, let’s say that you have a task where you want to calculate the minimum distance from every well to the closest platform. If you were to run this process for the entire North Sea, it might take a while. If you were only interested in the wells within a particular licence block, then wouldn’t it be really cool if you could just do this geoprocessing on your licence block and mask out the rest of the North Sea? Yes? Ok, that’s what a geoprocessing mask does for you.
Mask Hierarchy
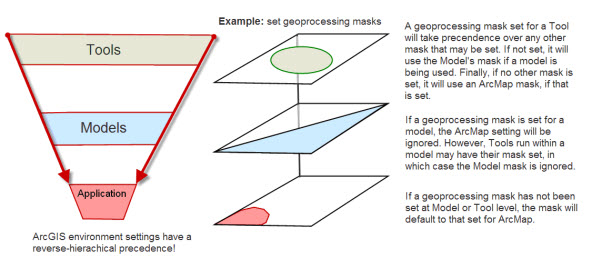
The tricky bit is that you can set up three different hierarchical levels of geoprocessing masks. These are:
- Tool Mask
- Model Mask
- Application Mask
BUT one will always take precedence over the others.

If you are a new or casual user of ArcGIS you might not know that ‘environment’ settings affect geoprocessing functions in a reverse hierarchical manner. In other words, they are the least important of the 3 levels.
So, if you set a geoprocessing mask, for a specific tool, say, the Buffer Tool, it trumps any other geoprocessing mask set in ArcGIS Desktop, such as application ‘environment variables’. Conversely, a geoprocessing mask set at the application level is only applied when no other masks exist for the specific Tool being used or for a Model in which the Tool might be used.
The 3 levels of geoprocessing masks are set in the following ways:
Application Settings
Once set, the application (or ‘environment’) settings apply to all geoprocessing within the ArcMap document except for the Models and/or Tools for which you have set the same environment variable. The environment settings for the ArcMap application are set via:
Tools Menu > Options > Environments… > Raster Analysis Settings > Mask
Model Settings
Once set they apply to all geoprocessing tools used within the model and supersede all application settings, except where the environment settings have been established for a tool within the model. The Mask setting is established for a model using:
Right-click model > Properties > Environments… > Raster Analysis Settings > Mask
Tool Settings
Once set, these tool settings supersede all other environment or model settings. Using the Buffer Tool as an example, the geoprocessing Mask is set via:
ArcToolbox > Proximity > Buffer > Environments… > Raster Analysis Settings > Mask
So there you have it! The concept of a spatial mask is fairly straight forward, but when used in geoprocessing we have to remember that there are three different levels at which it can be set. Additionally, Tool Mask trumps Model Mask trumps Application Mask!
Posted by Chris Skelly, Training Manager, Exprodat.


