Georeferencing images such as scanned maps are a common way of importing legacy or paper map data. However, sometimes vector based illustrations are required to be imported into GIS; often these vector drawings have no reference data. When these unreferenced data are added into ArcMap using the ArcGIS Data Interoperability extension they will, by default locate to the 0, 0 position according to the data frame coordinate system.
To assign unreferenced vector data a correct geographic position the Spatial Adjustment tool should be used. The Spatial Adjustment tool acts in a similar way to the Georeferencing tool only that it includes more options due to the differences associated with vector and raster data.
- Use the Quick Import tool in the Data Interoperability extension to extract layers. Identify the layers useful to your study for which you know have defined location (a reference point like a grid will be useful) or point data that has an assigned X, Y location in a report.
- Open the Spatial adjust toolbar (Customize>Spatial Adjustment).
- Add layers to the data frame. Since the data interoperability extension imports to a geodatabase the user assigned earlier.
- Open an edit session (spatial adjustment can only run in an edit session).
- Select which vector layers to process for adjustment.

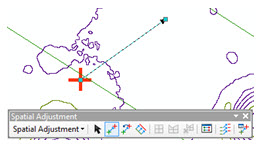
- Select the Displacement Link tool – this behaves like the “Add control points” tool on the Georeferencing toolbar.

- Using the Displacement Link tool click a feature that you have a known coordinate for, like a UTM grid or graticule.

- Right-click a nearby arbitrary location (unless you have a reference point to locate against).
- Select Link Table to see the list of displacement points assigned in your session (this is similar to the control point table tool on the Georeferencing toolbar).

- In the table edit X Destination and Y Destination to the known location. This transforms the vector data based on the comparison of the coordinates of source and destination points.

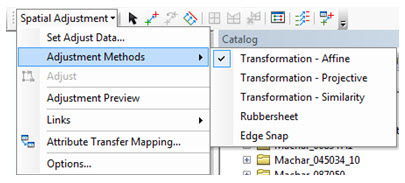
- The Spatial Adjustment tool provides several methods of adjustment that are explained in the “About spatial adjustment transformations” ArcMap help. These include Affine, Projective, Similarity transformations as well as Rubbersheet and Edge Snap.

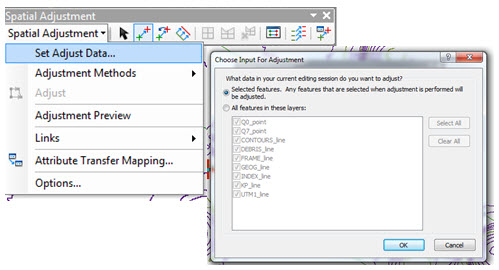
- Make sure you are moving all the data you want by clicking the Set Adjust Data button which brings up a dialog allowing you to select which layers to spatially adjust.
- To initiate the adjustment click the Adjust menu option in the Spatial Adjustment drop-down menu.
One last hint: Once the data has adjusted do not save the edits as the software may not be able to process the quantity of data nodes. This can lead to ArcGIS appearing to hang. Instead copy the features to a new feature class. This can be done using ArcToolbox; by opening the ArcCatalog panel and loading data directly into a feature class; or by selecting items in edit session and right-click copying them to another ArcMap document with target feature class open in edit session paste.
You should now have successfully transferred unreferenced CAD data into a spatially aware GIS database.
Posted by Simon Kettle, GIS Technician, Exprodat.


